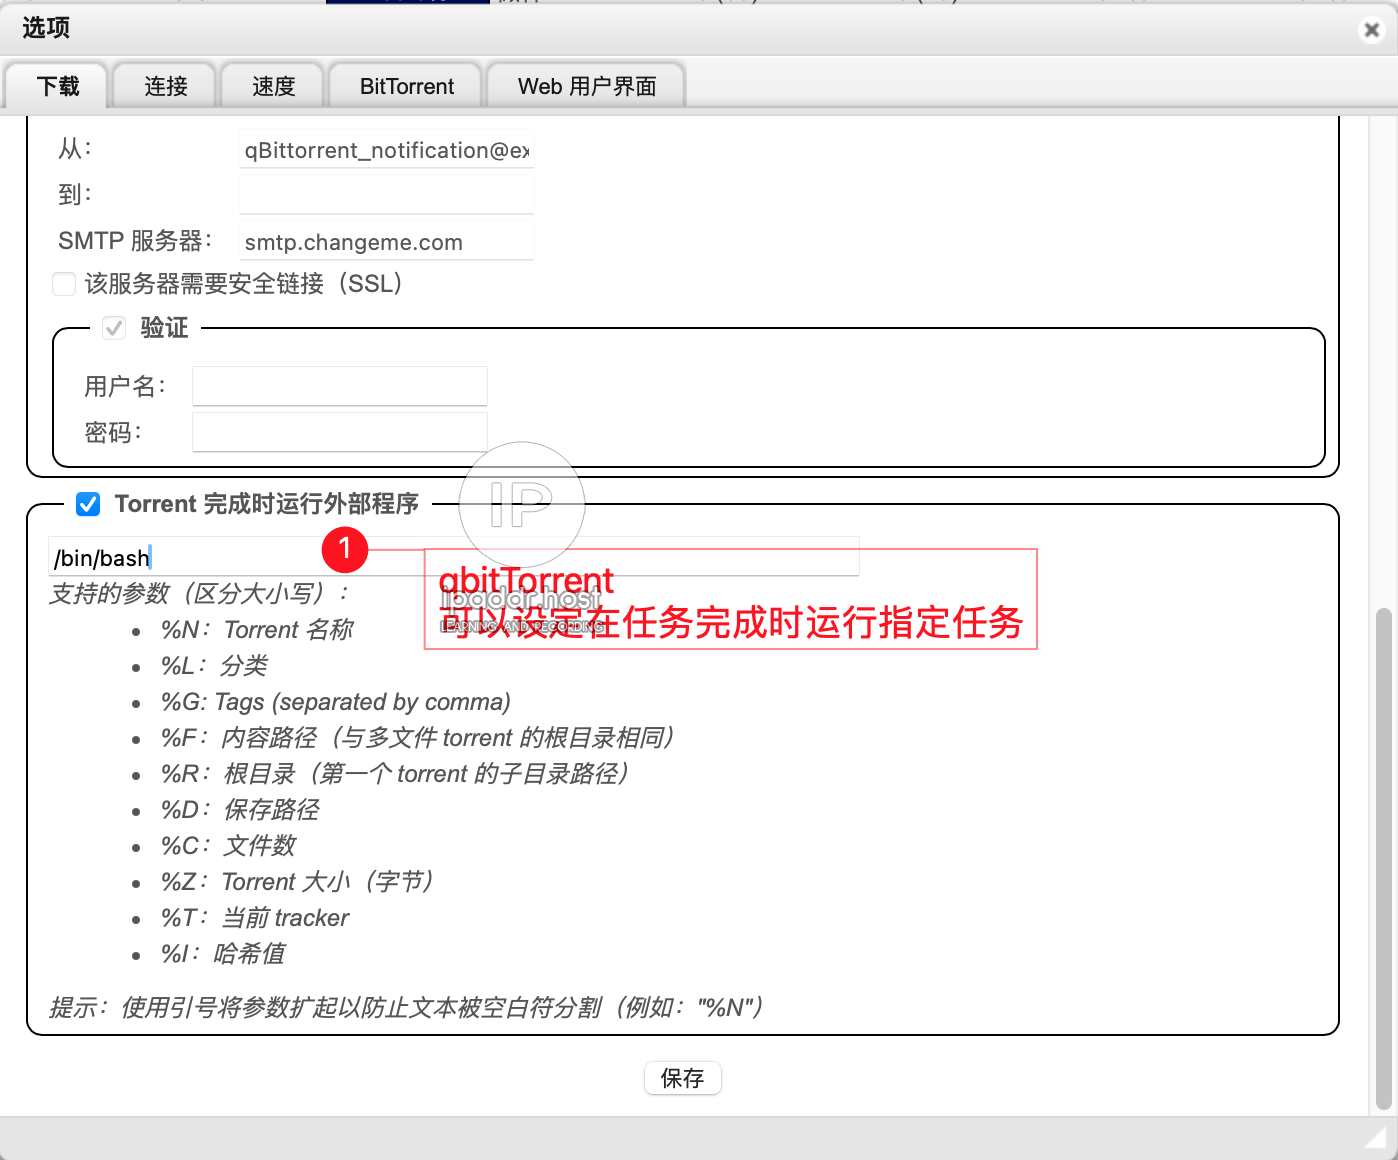
在使用 NASCTL 这类软件,在手机上管理 transmission 和 qBittorrent 时,我们可能会担心它会不会使坏。
假如开发者恶意设置这个选项,可能会破坏我们的 NAS,是能在我们的系统中植入木马程序的。

有没有办法监控所有操作
答案是有的,我们可以使用 Nginx 代理 qb 的所有流量,并记录 request_body。这样此类客户端对我们 tr 和 qb 做的所有操作就都能被记录了,如果发现被植入了木马,我们可以查看日志,搜索相关内容,确认是不是客户端给我们植入了非我们控制的程序。
前提条件
假如我们的下载程序之前应该使用下面地址访问:
- Transmission:http://192.168.1.80:9091/transmission/
- qBittorrent:http://192.168.1.80:8080/
我们想要使用 Nginx 代理所有流量,代理之后我们使用下面地址访问:
- Transmission:http://192.168.1.80:18080/transmission/
- qBittorrent:http://192.168.1.80:18080/
注意:原先的端口为 9091 和 8080,代理之后的端口为 19091 和 18080。
找到 NGINX 配置文件
一般情况下这个文件的位置位于 /etc/nginx/nginx.conf,这个文件的位置可以通过下面方式找到。
在命令行中执行 nginx -V,即可输出编译参数,其中 --conf-path=/etc/nginx/nginx.conf 就是默认的 nginx.conf 路径。
[root@server02 nginx]# nginx -V
nginx version: nginx/1.20.2
built by gcc 4.8.5 20150623 (Red Hat 4.8.5-44) (GCC)
built with OpenSSL 1.0.2k-fips  26 Jan 2017
TLS SNI support enabled
configure arguments: --prefix=/etc/nginx --sbin-path=/usr/sbin/nginx --modules-path=/usr/lib64/nginx/modules --conf-path=/etc/nginx/nginx.conf --error-log-path=/var/log/nginx/error.log
分析 NGINX 初始配置
以下是一个初始的 NGINX 配置:
user  nginx;
worker_processes  auto;
error_log  /var/log/nginx/error.log notice;
pid        /var/run/nginx.pid;

events {
    worker_connections  1024;
}

http {
    include       /etc/nginx/mime.types;
    default_type  application/octet-stream;
    log_format  main  '$remote_addr - $remote_user [$time_local] "$request" '
                      '$status $body_bytes_sent "$http_referer" '
                      '"$http_user_agent" "$http_x_forwarded_for"';
    access_log  /var/log/nginx/access.log  main;
    sendfile        on;
    #tcp_nopush     on;
    keepalive_timeout  65;
    #gzip  on;
    include /etc/nginx/conf.d/*.conf;
}
以下部分指定了NGINX需要在日志中记录的内容:
    log_format  main  '$remote_addr - $remote_user [$time_local] "$request" '
                      '$status $body_bytes_sent "$http_referer" '
                      '"$http_user_agent" "$http_x_forwarded_for"';
这是定义了一个 main 日志格式,包含了后面的所有参数。
创建新的日志记录格式
我们的需求是记录所有 POST 内容,因此我们需要在 main 基础上新增一个自定义的日志记录格式。
我们在这三行文件下方新增一个配置,并将 $request_body 加入到末尾,这样调用这个新的日志格式时,即可在日志中同时记录 POST BODY 了。
下面我们定义了一个名为 mainWithBody 的日志格式,并在末尾添加了 $request_body,由 3 行变成了 4 行。
    log_format  main  '$remote_addr - $remote_user [$time_local] "$request" '
                      '$status $body_bytes_sent "$http_referer" '
                      '"$http_user_agent" "$http_x_forwarded_for"';
    log_format  mainWithBody  '$remote_addr - $remote_user [$time_local] "$request" '
                      '$status $body_bytes_sent "$http_referer" '
                      '"$http_user_agent" "$http_x_forwarded_for"'
                      '"$request_body"';
将修改同步到 NGINX 主配置
修改后的完整配置应该是这样的:
user  nginx;
worker_processes  auto;
error_log  /var/log/nginx/error.log notice;
pid        /var/run/nginx.pid;

events {
    worker_connections  1024;
}

http {
    include       /etc/nginx/mime.types;
    default_type  application/octet-stream;

    log_format  main  '$remote_addr - $remote_user [$time_local] "$request" '
                      '$status $body_bytes_sent "$http_referer" '
                      '"$http_user_agent" "$http_x_forwarded_for"';

    log_format  mainWithBody  '$remote_addr - $remote_user [$time_local] "$request" '
                      '$status $body_bytes_sent "$http_referer" '
                      '"$http_user_agent" "$http_x_forwarded_for"'
                      '"$request_body"';

    access_log  /var/log/nginx/access.log  main;
    sendfile        on;
    #tcp_nopush     on;
    keepalive_timeout  65;
    #gzip  on;
    include /etc/nginx/conf.d/*.conf;
}
代理下载程序并指定使用新的日志记录格式
在上述配置文件的末尾,我们可以看到这一行 include /etc/nginx/conf.d/*.conf;,此行配置指定了 NGINX 在启动时会查找 /etc/nginx/conf.d/ 下的所有结尾为 .conf 的配置文件,并载入一并启动。
我们需要在这个目录下新建一个 proxy.conf 用来启动反向代理。
以下是这个配置文件的内容和说明:
server {
    # 指定监听端口为 18080
    listen       18080;
    server_name  localhost;

    charset utf-8;

    # 指定日志的位置为 /var/log/nginx/qb.18080.access.log
    # 日志格式为刚才定义的 mainWithBody
    access_log  /var/log/nginx/qb.18080.access.log  mainWithBody;

    location / {
        # 代理 qBittorrent
        proxy_pass  http://192.168.1.80:8080/;
        proxy_set_header X-Forwarded-Host $http_host;
    }

    location /transmission/ {
        # 代理 qBittorrent
        proxy_pass  http://192.168.1.80:9091/transmission/;
        proxy_set_header X-Forwarded-Host $http_host;
    }
}
验证 NGINX 配置
使用下面的命令来验证配置是否正确,如果输出为 ok 和 successful 则表示配置文件无误:
[root@server02 conf.d]# nginx -t
nginx: the configuration file /etc/nginx/nginx.conf syntax is ok
nginx: configuration file /etc/nginx/nginx.conf test is successful
当配置出现错误时,会输出下面这种包含 emerg 和 failed 的文本。
[root@ server02 conf.d]# nginx -t
nginx: [emerg] unknown directive "iproxy_pass" in /etc/nginx/conf.d/proxy.conf:14
nginx: configuration file /etc/nginx/nginx.conf test failed
重载 NGINX 配置
当确认配置正确后,我们可以在命令行执行以下指令来通知 NGINX 重新载入新配置,正确重载时没有任何输出:
nginx -s reload检验端口是否已经启动
我们可以使用 netstat 工具检查 nginx 是否已经成功监听代理端口。
当输出中有 0.0.0.0:18080时,即表示 nginx 已经成功载入配置,启动了 18080 端口的监听。
[root@nas conf.d]# netstat -tunlp|grep nginx
tcp        0      0 0.0.0.0:80              0.0.0.0:*               LISTEN      1908/nginx: master
tcp        0      0 0.0.0.0:18080           0.0.0.0:*               LISTEN      1908/nginx: master
修改 NASCTL 的配置
在 NASCTL 软件中编辑配置,将地址由之前的修改为反向代理的地址(主要是端口)。
- 原地址:
- tr: http://192.168.1.80:9091/transmission/
- qb: http://192.168.1.80:8080
- 新地址(端口都是刚刚反向代理配置的18080):
- tr: http://192.168.1.80:18080/transmission/
- qb: http://192.168.1.80:18080
其他配置保持不变。
保存后重启 NASCTL 可以保证它一定会重新读取配置。
查看日志
在命令行中我们可以执行以下指令来监控日志的新增内容:
tail -f -n 10 /var/log/nginx/qb.18080.access.log执行完上述命令后,命令行中会持续输出该日志文件新增的内容,我们可以看到以下格式的日志数据,其中每行日志最后由双引号包裹的部分就是由 NASCTL 发送给 qb 的数据。
192.168.123.2 - - [27/Dec/2023:13:53:23 +0800] "POST /api/v2/torrents/pause HTTP/1.1" 200 0 "http://192.168.1.80:18080" "Dart/3.2 (dart:io)" "-""----dio-boundary-1830941146\x0D\x0Acontent-disposition: form-data; name=\x22hashes\x22\x0D\x0A\x0D\x0Ac157c358117b817af79001b62cd0ab811811d755\x0D\x0A----dio-boundary-1830941146--\x0D\x0A"注意:一般情况下只有 POST 请求才会有 request_body 记录到日志中,GET 请求日志中会显示为 -。
注意
若您将此反向代理映射到公网,仍然可能会遭到黑客攻击,当黑客破解了您的密码后,由于黑客和nasctl都是从同一入口访问qb的,此时您将无法分辨是由谁执行了非法操作。
比较安全的方法是实用 虚拟专用网 连接,不将其开放到公网上。
工具说明
您可能需要使用下面指令来安装必要的工具,如 netstat tail。
yum install net-tools tail -y结论
这样当我们发现自己的 NAS 中出现恶意程序时,就可以查看日志,搜索相关程序的名称,查看是不是由 NASCTL 导致的。
以上配置只是一个示例,它在 CentOS 和 Fedora 等 yum 包管理器系统中肯定能够使用,其他环境的用户,可能要根据实际情况修改。

这篇文章还没有人留言,快来抢沙发吧。