一两台服务器,我们可以使用光盘装系统,1小时左右就能搞定。
假如有成百上千台服务器需要安装操作系统,如果还一个个用光盘安装,会累死的。
于是我就尝试使用PXE启动,配合kickstart安装需要的包。
下面记录PXE启动服务器的配置,kickstart安装及使用请查看CentOS安装kickstart脚本工具并创建系统自动安装脚本。
1.安装tftpserver和dhcpserver及syslinux。
使用yum安装。
yum install tftp-server dhcp syslinux -y
其中,tftp-server提供tftp服务,为pxe客户端提供文件。
dhcp提供dhcpd服务,为pxe客户端提供ip地址。
安装syslinux是为了使用pxelinux.0文件。
安装这些服务的服务器我设定其ip地址为192.168.16.180。
2.配置dhcpd.conf。
使用vim编辑/etc/dhcp/dhcpd.conf
下面配置中:
网关:192.168.16.1
网络:192.168.16.0/24
PXE SERVER:192.168.16.180
地址池:192.168.16.240-250
ddns-update-style interim;
ignore client-updates;
allow booting;
allow bootp;
subnet 192.168.16.0 netmask 255.255.255.0
{
        option routers 192.168.16.1;
        option domain-name "s.un";
        option domain-name-servers 192.168.16.252;
        option subnet-mask 255.255.255.0;
        option time-offset -18000;
        default-lease-time 21600;
        max-lease-time 43200;
        range dynamic-bootp 192.168.16.240 192.168.16.250;
        filename "pxelinux.0";
        next-server 192.168.16.180;
}
3.配置TFTP服务器。
/etc/xinetd.d/tftp
service tftp
{
        socket_type             = dgram
        protocol                = udp
        wait                    = yes
        user                    = root
        server                  = /usr/sbin/in.tftpd
        server_args             = -s /tftpboot
        disable                 = no
        per_source              = 11
        cps                     = 100 2
        flags                   = IPv4
}
4.准备启动文件。
因为我目前只做测试,所以启动文件全从CentOS6.4光盘中拷贝。
建立/tftpboot、/tftpboot/pxelinux.cfg目录。
并拷贝下面文件至相应目录。
假设将光盘挂载至/mnt。
cd /mnt/isolinux
mkdir /tftpboot
mkdir /tftpboot/pxelinux.cfg
cp boot.msg initrd.img splash.jpg vesamenu.c32 vmlinuz /tftpboot/
cp pxelinux.cfg /tftpboot/pxelinux.cfg/default
cp /usr/share/syslinux/pxelinux.0 /tftpboot
树形目录列一下,大家对照看看。
[root@bak tftpboot]# tree
.
├── boot.msg
├── initrd.img
├── pxelinux.0
├── pxelinux.cfg
│   └── default
├── splash.jpg
├── vesamenu.c32
└── vmlinuz

1 directory, 7 files
5.启动dhcp及xinetd。
[root@bak tftpboot]# service dhcpd restart
正在启动 dhcpd:                                           [确定]
[root@bak tftpboot]# service xinetd restart
停止 xinetd:                                             [失败]
正在启动 xinetd:                                          [确定]
6.客户端使用PXE启动即可。
下面是启动后的图片:
[caption id="attachment_581" align="aligncenter" width="720"] pxe启动[/caption]
[caption id="attachment_580" align="aligncenter" width="640"] pxe启动linux[/caption]
7.尝试修改pxelinux.cfg文件修改启动菜单。
default vesamenu.c32
#prompt 1
timeout 600

display boot.msg

menu background splash.jpg
menu title Welcome to QianSW.Com PXELinux!
menu color border 0 #ffffffff #00000000
menu color sel 7 #ffffffff #ff000000
menu color title 0 #ffffffff #00000000
menu color tabmsg 0 #ffffffff #00000000
menu color unsel 0 #ffffffff #00000000
menu color hotsel 0 #ff000000 #ffffffff
menu color hotkey 7 #ffffffff #ff000000
menu color scrollbar 0 #ffffffff #00000000

label net
  menu label ^Netinstall
  menu default
  kernel vmlinuz
  append initrd=initrd.img
label web
  menu label Kickstart ^Web Server
  kernel vmlinuz
  append initrd=initrd.img ks=https://www.ipaddr.host/ks/web.cfg
label db
  menu label Kickstart ^Db Server
  kernel vmlinuz
  append initrd=initrd.img ks=https://www.ipaddr.host/ks/db.cfg
label custom
  menu label Use ^custom kickstart configuration(Press [tab])
  kernel vmlinuz
  append initrd=initrd.img ks=
label local
  menu label Boot from ^local drive
  localboot 0xffff
效果如下:
[caption id="attachment_586" align="aligncenter" width="640"]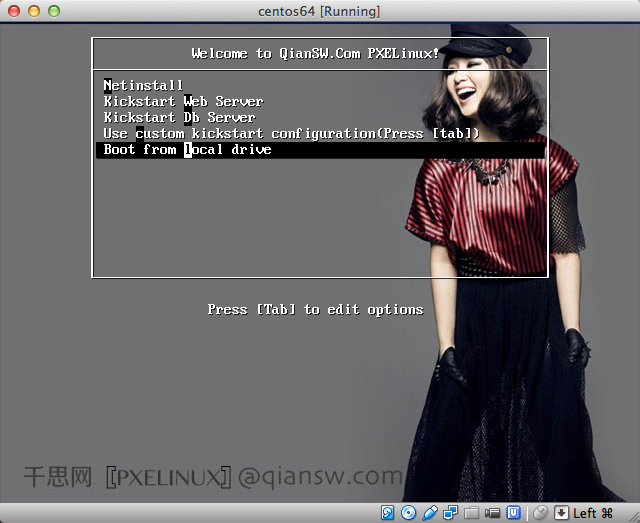 pxe启动pxelinux[/caption]
这篇文章还没有人留言,快来抢沙发吧。